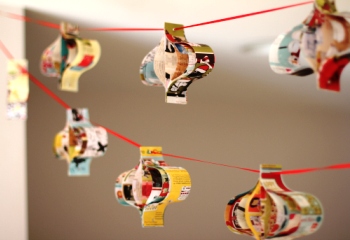
Pretty Paper Garlands & Ornaments

You will need:
1. Cut Paper Strips.
Though the original paper garland inspiration post used pages of old books and comic strips, I wanted to use a stiffer paper (plus, we didn't have any newspaper in the recycling bin since I used it all for a painting project over the weekend). I used a Paper Source catalog that measured 10.5" x 6" because I liked the weight of the paper and the colorful pictures inside, and also because the dimensions of the catalog seemed about right for my purposes and were the perfect size to fit in my rotary trimmer.
You will need 7 paper strips per ornament -- one short center strip plus three increasingly large pairs of symmetrical strips. You can make the strips any size, but I decided on 1.5 inch wide strips and made my center strip 4-5 inches. The three outer strip pairs were ~6, 7, and 8+ inches long (I varied the length on the longest one). With the catalog I was using, I saved my favorite pages (i.e., those with the prettiest pictures) for the longest (outer) strips.
A rotary trimmer will make this process super fast and easy since it has a built in ruler, blade, and cutting mat. But you can always use whatever cutting tools you have on hand.
2. Fasten Paper Strips.
Align the paper strips on one short end so you have, for example, it stacked as such: 8, 7, 6, 4, 6, 7, 8" strips. To fasten the strips, choose one option below.
Option 1 (this is what I did): Punch a 1/8" hole in the middle of the short (1.5") end, about 1/4" in. Insert a 1/8" eyelet into the hole and use an eyelet setter and hammer to fasten the eyelet.
Option 2 (if you don't have an eyelet tool and/or hate hammers): Follow the punch method for option 1 but thread a ribbon through the hole and tie at the top of the ornament.
Whichever option you go for, repeat it on the other side. As you line up the ends of the reverse side of the ornament, it will be super cool to see your ornament take shape!
3. Hang!
I hung my garlands in the large passage between our living and dining rooms. Because I was winging it, I didn't want to lock in the ornament spacing by tying knots on either side of the eyelet (as shown in the original inspiration post) and it turned out I didn't need to; the garlands stayed in place on the ribbon without needing to make ties. I hung a double strand with 5 ornaments on the top strand and 8 on the second; I simply fed the ornaments onto the ribbon via the eyelet holes and suspended in the doorway with tape on each end. If you go with option 2 for fastening, simply thread through the little bit of space between the ribbon and ornament.
And that's it! Aren't these just beautiful? And how excellent that they're eco-friendly and cost nothing? LOVE.
All images by Christine Koh.


