
DIY: 10 Minute Jewelry Boards
 I love necklaces. Except when they're clumped and tangled, as most of my collection has been for some time now. I was planning on buying a cork board to make sense of the mess, and then this past weekend, as I stared disdainfully at furniture packaging that needed to be broken down for recycling, I had a light bulb moment: turn the large Styrofoam sheets into jewelry boards! It would save the effort of breaking down the material to fit into our recycling bin, and save me the cost of cork boards! Here's the how-to for this ridiculously easy and awesome project:
You will need:
- Styrofoam boards (the ones I used were about 20 x 30 x 0.75)
- fabric (I used a lightweight pale pink fabric that I had kicking around in my closet -- not a pattern so the jewelry would stand out)
- glue gun
- push pins
1. Cut fabric several inches larger around than your Styrofoam boards. I didn't use a ruler; just estimated about 4-5 inches wider on each side and cut. If the fabric is wrinkly, iron it.
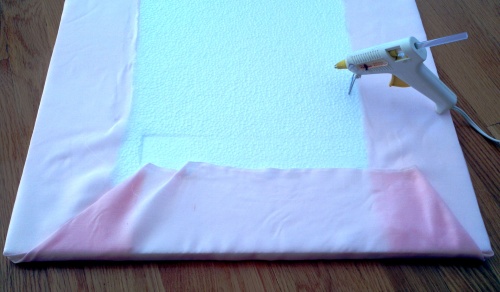
2. Plug in your glue gun to heat it up. Lay the fabric down flat on the floor and lay a Styrofoam sheet in the center. Starting with one long side, glue the fabric edge to the back of the board. Repeat on the second long side, pulling the fabric snug so it doesn't gap in front. (Note: I wasn't worried about perfection on the edges or anything...I just wanted to cover the boards quickly and figured once the jewelry was on it, you wouldn't notice any imperfections.)

3. Fold the short ends as you would when wrapping a present and glue the fabric edges to the back of the board. And you're done!

I created two jewelry boards and overlapped them (one was two narrow for the space and two, too wide). I used clear push pins and created a top row for long necklaces and a bottom row on one of the boards for shorter ones. You could also use push pins and ribbon to run a line for earrings. I am utterly thrilled with the result, not to mention that it took me 10 minutes to put these boards together! See where those two pairs of sunglasses are sitting, at the base of the boards? That's where all of my necklaces (plus a bunch of other crap) were piled. I wish I had taken a before picture!

There are two even larger Styrofoam boards that came with the furniture packaging. I'm planning on using the same approach as above to render an easy way to display Laurel and Violet's artwork, or as inspiration boards in my office. And I'm psyched that I don't have to break down the Styrofoam (cue sprays of Styrofoam bits flying everywhere) to fit into my recycling bin!